GitHub repo: https://github.com/Chieze-Franklin/Quic
Introduction
Quic is a web development framework that enables you create rich web applications with less code than is usually needed.
Quic is basically a preprocessor; it goes through your HTML file, looking for custom tags, and producing standard HTML, CSS, JavaScript (and pretty much anything) from such tags.
When a custom tag is encountered Quic loads the appropriate assembly and locates a class with the same name as the tag. The class is then instantiated, and its Render method is called to emit the relevant codes and/or files.
So we can say Quic allows you to delegate the dirty jobs to a class, and include that class in your HTML file as a custom tag.
Background
- There are no tags.
Quic has no custom tags of its own. So, technically, you don't have a lot of new things to learn.
- Works well with any XML document.
- Quic makes your code more readable.
- Easy to refactor.
- Quic does more than just emit code.
Quic doesn't just emit codes, it can create needed files in the output directory.
- Works well with other web frameworks.
Quic works well with other web frameworks/technologies because Quic is simply a preprocessor. It goes through your file looking for custom tags that make sense to it. Every other content on the file is left untouched.
We ended the article with a healthy discussion of the Quic-specific attributes expected in a <html> tag.
In this article, we'll begin by refreshing our memories of the
Quic bar. We will take a look at what Quic expects to find in the
<head> and
<body> tags. We will then learn about
value providers. Finally, I will list all the custom tags (and their respective attributes) defined in the assemblies packaged with this article so that you can start utilizing them in your web pages.
To successfully follow the source codes in this framework, all you need is a healthy knowledge of C#. Two of the core namespaces used are
System.Xml.Linq (I previously used
System.Xml, but found it difficult retrieving line number and column number information) and
System.Reflection to help me load the relevant assemblies and classes.
Getting Started
System Requirements
- The app was originally built on a Windows 8 machine, but should run with no modification on Windows 7 and Windows 10.
- The target framework is .NET Framework 4.5, but the source code can be built against many previous versions, as well as future versions.
You can skip this part if you have read it in the previous article.
I am assuming you have downloaded (and extracted files from) the relevant zip files.
- Run the solution; the start-up project should be Quic.App, so this should run the Quic.App.exe executable.

- The Quic bar is an always-visible floating toolbar. It's size allows you to continue writing your markup in your preferred editor, returning easily to the bar whenever you are ready to build the file. When maximized, the bar is fixed at the top of your screen, but when in normal window mode (restored), it can be dragged to any location on the screen.
In building a file, custom recognizable tags in the file are interpreted/processed, similar to how a PHP interpreter/engine works on a PHP file. Unlike a PHP engine which may send the result of the processing to a browser, the Quic bar saves its own result as an output file in the specified output directory, along with every other asset that was generated during the build.
- Using the Quic bar is easy. Having typed your markup in an editor of your choice, select the file (file extension is irrelevant), select your output directory, then click the Build source file button.

- The Show/hide notifications button will have a green badge on it if the build was successful. Click the button to view any available notifications.

- Click the Open output directory button to navigate to the output directory.
Notice the auto-generated files and folders in the output directory.

Using Quic Custom Tags on Your Web Pages
Basic Structure
Because of the focus on HTML documents, Quic expects the root tag of the document to be
<html>. Quic expects your
<html> tag to have
<head> and
<body> tags. These tags are always in lower case.
In the first part of this write up we looked at the
<html> tag, and the Quic-specific attributes expected in it. These attributes were classified into
namespace attributes,
processing option attributes, and the
output file attribute.
Here we discuss the
<head> and
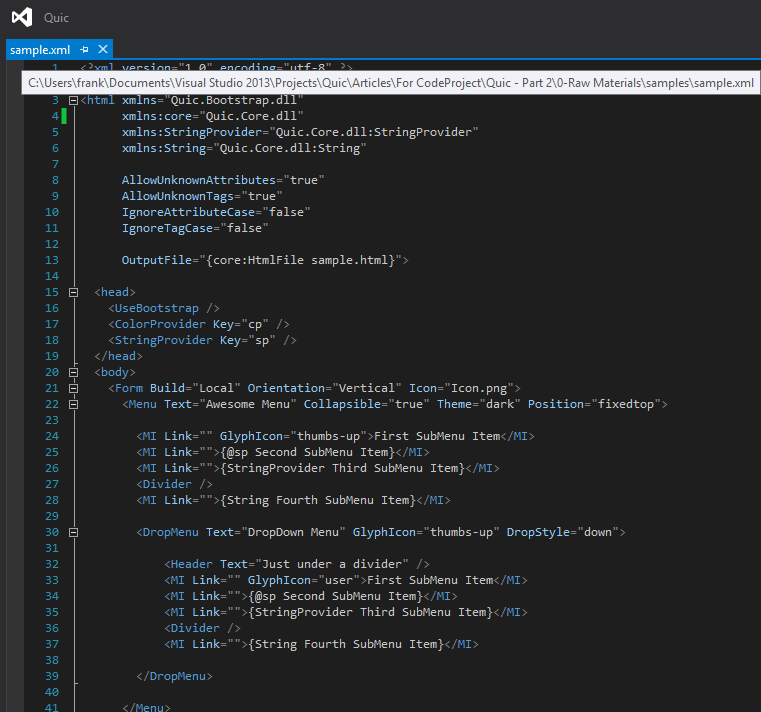
<body> tags. A sample Quic document is shown below.

With respect to Quic, the
<head> tag is expected to contain
resource elements. These elements usually do not contribute to the UI of the web page directly, instead serving as
helpers for UI elements.
Resource elements inherit from the class
Quic.ResourceElement [
Quic\Core\Elements\ResourceElement.cs].
Quic.ResourceElement inherits from the class
Quic.Element [
Quic\Core\Elements\Element.cs], and adds a string member property called
Key. This property can be set from mark-up.
In every Quic document, resource elements with their
Key attributes set to a valid identifier are stored in a resource dictionary (this implies two resource elements cannot have the same key), and can be referenced many times in the document using their keys. We will see how to reference resource elements when we discuss
value providers.
Resource elements with no
Key attributes set are invoked (usually by calling their
Render methods) only once, when the output file is being generated, and discarded afterwards.
In the sample document shown above, looking at lines 16-18, you can see 3 resource elements:
<UseBootstrap>,
<ColorProvider> and
<StringProvider>. Notice that the first has no
Key attribute set. That is because we need that particular resource element only once in the document (to create the necessary bootstrap files).
With respect to Quic, the <body> tag contains UI elements. These elements define the user interface of the document.
UI elements inherit from the class Quic.UIElement [Quic\Core\Elements\UIElement.cs]. Quic.UIElement inherits from the class Quic.Element[Quic\Core\Elements\Element.cs], and adds many UI-centric properties that can be set from mark-up, like BackColor, Text, Width.
All elements (UI and resource elements) come with a Name property that can be set from mark-up. In every Quic document, elements with their Name attributes set to a valid identifier are stored in an element dictionary (this implies two elements cannot have the same name). This is of particular importance to UI elements because giving a UI element a name allows the attributes of that element to be accessed in other parts of the document. For instance, on line 106, we set the text property of the button element named btn2 to the value of the text property of the element named btn1.
<Button Name="btn2" Text="{$btn1.Text}" />
This notation will be explained further under value providers but the syntax is simple to grasp. To access the value of an element's attribute, start with an opening brace {followed by a dollar sign $ then the element's name then period . then the attribute name then a closing brace }.
When assigning a value to an attribute, the value can either be a literal value or an expression value.
A literal value simply starts with a quotation mark and ends with a matching quotation mark, and always represents a string object. In the example shown below, the Textattribute of the <Button> tag is set to the literal string object, "My First Button"
<Button Name="btn1" Text="My First Button" />
An expression value starts with a quotation mark followed by a single opening brace, and ends with a closing brace followed by a matching quotation mark, and can represent any type of object. In the example below, the Text attribute of the <Button> tag is set to an expression value: the actual value will be computed when the page is being parsed.
<Button Name="btn2" Text="{$btn1.Text}" />
The object that computes/evaluates an expression value is called a value provider. A value provider must implement the interface Quic.IValueProvider[Quic\ValueProviders\IValueProvider.cs], and this involves implementing the overloaded Evaluate methods which convert the input argument of the value provider to an appropriate output.
Within the matching braces of an expression value there are two ways to invoke a value provider:
- By class name
- By using a key in the document's resource dictionary
To demonstrate the various ways of calling a value provider, I will use the value provider StringProvider [Quic.Core\ValueProviders\StringProvider.cs]. This is basically an alias for Quic.StringVP [Quic\ValueProviders\StringVP.cs] which (for now) does nothing other than return the input argument passed into it as output, as shown in itsEvaluate methods:
public override object Evaluate(object input)
{
  return Evaluate(input.ToString());
}

public override object Evaluate(string input)
{
  return input;
}
After the opening brace of the expression value, type the name of the class from which the value provider object would be instantiated. If the value provider expects an argument/input (most value providers do), then type the argument after the class name, separating them with a space. For instance, on line 114, we have:
<Button Name="btn4" Text="{StringProvider My Fourth Button}" />
In the code snippet above, the value provider that will provide the value for the Text attribute of the <Button> tag is a StringProvider, and its agument is My Fourth Button.To instantiate this value provider, Quic must first find a matching namespace attribute, and it finds it on line 5:xmlns:StringProvider="Quic.Core.dll:StringProvider".This means in the assembly Quic.Core.dll there is a class named StringProvider from which Quic will instance an actual object (which must be a value provider, or an exception is thrown), and invoke the Evaluate method of the object, with "My Fourth Button" as the method's argument.
On line 117 we have something similar:
<Button Name="btn5" Text="{String My Fifth Button}" />
In the code snippet above, the value provider that will provide the value for the Text attribute of the <Button> tag is a String, and its agument is My Fifth Button.Quic must first find a matching namespace attribute, and it finds it on line 8: xmlns:String="Quic.Core.dll:String".To instantiate this value provider, Quic searches for the appropriate class as earlier described. The problem is, there is no class named String in Quic.Core.dll.When Quic doesn't find a class with a matching name in the specified assembly, it suffixes the string "Provider" to the class name and performs the search again. Only if this second search fails does it throw an exception.In this case, it suffixes "Provider" to "String" to form "StringProvider", and, this time, it finds the desired class.
Because most value providers that convert string to basic types like Boolean, Color, DateTime are expected to be resources (extending Quic.ValueProviderResource[Quic\ValueProviders\ValueProvider.cs] which in turn extends Quic.ResourceElement), they have a Key attribute and can be specified in the <head> tag, as seen on line 18.
<StringProvider Key="sp" />
To invoke a value provider by its key, after the opening brace of the expression value, type the at character @ followed immediately by key. If the value provider expects an argument/input (most value providers do), then type the argument after the key, separating them with a space. For instance, on line 120, we have:
<Button Name="{@sp btn6}" Text="{@sp {String My Sixth Button}}" />
In the code snippet above, the value provider that will provide the value for the Name attribute of the <Button> tag is one with the key sp which, from line 18, is aStringProvider, and its agument is btn6.The advantage of this method (over using the class name) is that the value provider is created only once and reused wherever its key is specified.
The argument of a value provider can be another value provider. This is allowed since every value provider is expected to accept an argument and return a result. The inner value provider executes first, and its result becomes the argument for the outer value provider.
An example is seen on line 120:
<Button Name="{@sp btn6}" Text="{@sp {String My Sixth Button}}" />
The Text attribute of the <Button> tag will get its value from a value provider that has been stored in the document's resource dictionary with the key sp, which in turn will get its argument from an instance of StringProvider (which will be created at that point) with argument My Sixth Button.The level of nesting can go on indefinitely. When working with nested value providers, be sure to make every opening brace have a corresponding closing brace.
There is a useful value provider that comes with Quic, in the Quic.Core.dll assembly, called PropertyProvider [Quic.Core\ValueProviders\PropertyProvider.cs]. This value provider helps to reference the property/attribute values of elements.
Suppose I wanted to create three buttons, all having the same text, without having to repeat that text verbatim, I could simply set the text in the first button, and then reference it in the second and third buttons using PropertyProvider value provider, as shown below:
<Button Name="btn1" Text="My First Button" />
<Button Name="btn2" Text="{core:PropertyProvider btn1.Text}" />
<Button Text="{core:PropertyProvider btn1.Text}" />
Now all three buttons will have the same Text attribute. Additionally, if I need to change their Text attributes, I need only do it on btn1.
Because of how useful the PropertyProvider is, every Quic document comes with a default PropertyProvider. What's more, there is a very convenient way of accessing it: type the dollar sign $ after the opening brace, followed by the argument to the PropertyProvider. There's usually no need to leave any space between the$ and the argument. The above example can thus be rewritten as (as seen on lines 105 and 108):
<Button Name="btn1" Text="My First Button" />
<Button Name="btn2" Text="{$btn1.Text}" />
<Button Text="{$btn1.Text}" />
PropertyProvider expects the following formats of argument:
{element-name}.{attribute}: This returns the value of the attribute {attribute} of the element with name {element-name}.
See line 106:<Button Name="btn2" Text="{$btn1.Text}" />
{attribute}: This returns the value of the attribute {attribute} of the current element.
See lines 82 and 83:<Table Text="Awesome Table" Bordered="true"
Condensed="{$Bordered}"
this.{attribute}: This returns the value of the attribute {attribute} of the current element (same as above).
See lines 82 and 84:<Table Text="Awesome Table" Bordered="true"
Hover="{$this.Bordered}"
self.{attribute}: This returns the value of the attribute {attribute} of the current element (same as above).
See lines 82 and 85:<Table Text="Awesome Table" Bordered="true"
Striped="{$self.Bordered}"
parent.{attribute}: This returns the value of the attribute {attribute} of the parent element of the current element.
See line 124:<TD Context="{?$parent.Context}">
NOTE: The question mark, ?, after the opening brace represents lazy evaluation.
As expected, a Quic document is processed top-to-bottom. Whenever Quic comes across a referenced attribute, it expects that attribute (and the tag that it belongs to) to have been defined before that point. This is why we defined btn1 before accessing btn1.Text, or why we typed Bordered="true" before typing Condensed={$Bordered}. If an attribute is referenced before it is defined an exception may be thrown. (In the case of Condensed={$Bordered}, an exception will not be thrown but the default value of Bordered, which is false, will be used.) To avoid such outcomes we use the lazy evaluation syntax.
Lazy evaluation uses the same syntax as regular expression values, except that a question mark, ?, must immediately follow the opening brace, as seen on line 137:
<Button Text="{?$btn8.Text}" ButtonType="success" ng-model="angularJsModel" />
The Text attribute of the above <Button> references the Text attribute of an element named btn8 (which is not created until line 140). However, because of the ?following the opening brace, this attribute will be evaluated lazily. This means the attribute will NOT be evaluated when the input XML file is being parsed to create the Quic document object, but will be evaluated when the Quic document object is being rendered to the output HTML file and, by then, the element named btn8 must have been created.Lazy evaluation MUST be used when accessing parent attributes, as seen on line 124:
<TD Context="{?$parent.Context}">
This is because a parent element is fully created only after it's child elements have all been created.Lazy evaluation can be used with any value provider, not just PropertyProvider. So you could have:
<Button Name="btn4" Text="{?StringProvider My Fourth Button}" />
NOTE: Lazy evaluations may incur a slight performance overhead.
If the value of an attribute is expected to be a literal value which starts with the { character, in order for it not to be taken as an expression value by Quic, you have toescape the { character by typing {{.
<Button Text="{{$this.Text}" />
The Text attribute above will be assigned the string "{$this.Text}".Note that if the attribute value starts with a { but does not end with a }, it is also taken as a literal value. In this case, you should not escape the { character because Quic will take the value as a literal value. In other words, for Quic to take a value as an expression value, it MUST begin with a single { character and end with a matching }.
The content of a tag can also be provided by a value provider, as seen on lines 25 and 26:
<MI Link="">{@sp Second SubMenu Item}</MI>
<MI Link="">{StringProvider Third SubMenu Item}</MI>
Similar rules apply here as do when using value providers with attributes.
You can register a value provider as an implicit value provider. Implicit value providers don't have to be explicitly specified; Quic will invoke the appropriate implicit value provider based on the element/tag being acted on, and the attribute that is being assigned.
To explain the importance of registering implicit value providers, I'll use the class ColorProvider [Quic.Core\ValueProviders\ColorProvider.cs]. As you may have guessed, this value provider helps convert a string literal to a System.Drawing.Color object. To use it explicitly, I could type:
<winform:Button BackColor="{ColorProvider red}" />
If, however, I register ColorProvider as an implicit value provider in the matching class for <winform:Button>, then I could rewrite the above line simply as:
<winform:Button BackColor="red" />
This is the advantage of implicit value providers: you do not have to specify the value provider to use explicitly.
To register implicit value providers for a Quic element, override the
GetImplicitValueProvider method.
Every Quic element comes with a number of implicit value providers because they are registered in the
GetImplicitValueProvider method of the most fundamental class,
Quic.Element.

This is why every Quic element knows how to convert string literals provided as attribute values to the appropriate objects of basic data-types. For instance, the
Quic.PointVP [
Quic\ValueProviders\PointVP.cs] value provider converts a string input into a
System.Drawing.Point object.

Check out the interesting source code for
Quic.ColorVP [
Quic\ValueProviders\ColorVP.cs].
The implicit value providers registered for Quic.Element are not often sufficient. This is why you have the liberty to override the GetImplicitValueProvider method. This is exactly what we do in a number of Quic.Bootstrap.dll elements. For instance, the very core class BootstrapElement [Quic.Bootstrap\Elements\BootstrapElement.cs] provides its own implementation of the GetImplicitValueProvider method:
public override IValueProvider GetImplicitValueProvider(string propertyName, Type propertyType)
{
  if (propertyName == "Align")
  {
    return AlignmentProvider.Singleton();
  }
  else if (propertyName == "State")
  {
    return StateProvider.Singleton();
  }
  else if (propertyName == "Validation")
  {
    return ValidationStateProvider.Singleton();
  }

  return base.GetImplicitValueProvider(propertyName, propertyType);
}
Check out the source codes for the implicit value providers registered in various Quic.Bootstrap.dll elements in Quic.Bootstrap\ValueProviders\.
The current implementation of value providers has some serious limitations.
- A value provider accepts only one argument. Everything after the value provider is a single argument, including spaces. I would love to change that one way or another. The current implementation has the format:
Attribute="{ValueProvider arg}". I would love to implement the format: Attribute="{ValueProvider arg1, arg2, arg3, ...}"
- A value provider must be the only content of a tag or attribute value. I would love to change that so that multiple value providers (not nested, but siblings) can occur in a tag or attribute value, or so that a value provider can be interpolated within the content of a tag or attribute value. The current implementation has the format:
<Tag>{ValueProvider arg}</Tag>. I would love to implement the format: <Tag>...{ValueProvider1 arg}...{ValueProvider2 arg}...{ValueProvider3 arg}...</Tag>
Let me end this article with a proposal. I propose that custom element creators always provide a manifest file describing the elements (as well as value providers, file initializers) contained in their DLL files. This will not only be helpful to developers, but would also be helpful to development tools.
I have provided such manifest files in the samples folder.