Introduction
Quic is a web development framework that enables you create rich web applications with less code than is usually needed.Quic is basically a preprocessor; it goes through your HTML file, looking for custom tags, and producing standard HTML, CSS, JavaScript (and pretty much anything) from such tags.
When a custom tag is encountered Quic loads the appropriate assembly and locates a class with the same name as the tag. The class is then instantiated, and its
Render method is called to emit the relevant codes and/or files.So we can say Quic allows you to delegate the dirty jobs to a class, and include that class in your HTML file as a custom tag.
A quick (hehe, pun intended) example:
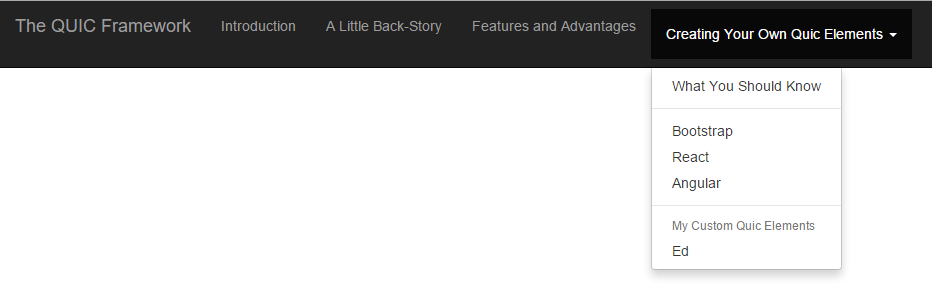
Suppose I want to include a dark, fixed-to-top Bootstrap navbar on my page,
<nav class=" navbar navbar-inverse navbar-fixed-top" role="navigation">
  <div class="navbar-header">
    <button type="button" class="navbar-toggle" data-toggle="collapse" data-target="#menu1-navbar-collapse">
      <span class="sr-only">Show/Hide</span>
      <span class="icon-bar"></span>
      <span class="icon-bar"></span>
      <span class="icon-bar"></span>
    </button>
    <a class="navbar-brand" href="#">The QUIC Framework</a>
  </div>
  <div class="collapse navbar-collapse" id="menu1-navbar-collapse">
    <ul class="nav navbar-nav">
      <li role="presentation">
        <a role="menuitem" href="">Introduction</a>
      </li>
      <li role="presentation">
        <a role="menuitem" href="">A Little Back-Story</a>
      </li>
      <li role="presentation">
        <a role="menuitem" href="">Features and Advantages</a>
      </li>
      <li class="dropdown">
        <a class=" dropdown-toggle navbar-btn" href="#" data-toggle="dropdown">
          Creating Your Own Quic Elements
          <b class="caret"></b>
        </a>
        <ul class="dropdown-menu" role="menu">
          <li role="presentation">
            <a role="menuitem" href="">What You Should Know</a>
          </li>
          <li role="presentation" class=" divider"></li>
          <li role="presentation">
            <a role="menuitem" href="">Bootstrap</a>
          </li>
          <li role="presentation">
            <a role="menuitem" href="">React</a>
          </li>
          <li role="presentation">
            <a role="menuitem" href="">Angular</a>
          </li>
          <li role="presentation" class=" divider"></li>
          <li role="presentation" class=" dropdown-header">My Custom Quic Elements</li>
          <li role="presentation">
            <a role="menuitem" href="">Ed</a>
          </li>
        </ul>
      </li>
    </ul>
  </div>
</nav>
Not only is the above code quite long, it is also not the prettiest thing to the eye.To make my page easy on the eye, I created a few C# classes like Menu, MI (or MenuItem), DropMenu, and delegated to them the responsibility of producing the appropriate codes. I then include those classes on my page, as shown below:
<Menu Text="The QUIC Framework" Collapsible="true" Theme="dark" Position="fixedtop">
  <MI Link="">Introduction</MI>
  <MI Link="">A Little Back-Story</MI>
  <MI Link="">Features and Advantages</MI>
  <DropMenu Text="Creating Your Own Quic Elements" DropStyle="down">
    <MI Link="">What You Should Know</MI>
    <Divider />
    <MI Link="">Bootstrap</MI>
    <MI Link="">React</MI>
    <MI Link="">Angular</MI>
    <Divider />
    <Header Text="My Custom Quic Elements" />
    <MI Link="">Ed</MI>
  </DropMenu>
</Menu>
Apart from the obvious advantages of being shorter in length and easier to read, even a first-timer to web development knows exactly what you are trying to achieve. That is, Quic makes your code more intuitive.Some of the advantages of Quic include:
- There are no tags.
Quic has no custom tags of its own. So, technically, you don't have a lot of new things to learn. Custom tags are created by developers. (A good number of times you may find yourself as both the creator and consumer of your custom tags.) Quic simply finds classes with the same names as the custom tags in appropriate assemblies (using reflection), and invoke theRendermethods of such classes. Developers of such custom tags should endeavour to provide adequate documentation for their custom tags.
As a consumer of such tags, you simply need to learn the tags you need for the job at hand. - Works well with any XML document.
Quic expects your document to be XML-compliant. This means you can use it with different types of documents like XAML and Android XML. But it also means that to use it with your HTML file, your HTML should really be XHTML. - More readable code.
One of the foundational ideas behind Quic is that, instead of using general-purpose tags like<div>to represent different constructs, we should use custom tags with names that adequately state their purposes. In the Quic example above, you can easily tell (or guess) what tags like<DropMenu>and<Divider>represent/do.
Similarly, you don't have to keep in memory all the CSS classes that are needed to make a<div>look like a drop menu; you simply use the<DropMenu>tag, and let it emit the relevant CSS codes. - Easy to refactor.
Quic makes refactoring easier because the refactoring can be done in theRendermethod of the appropriate class. If you need to change the markup that defines an element, say a table, instead of going through all your HTML files to effect such changes, you can simply do it in just one place: in theRendermethod of the appropriate class.
Tomorrow I may decide not to use Bootstrap at all. All I will need to do is to change what is emitted by the variousRendermethods of my various classes; my numerous HTML pages do not need to be changed a bit. - Quic does more than just emit code.
Quic doesn't just emit codes, it can create needed files in the output directory.
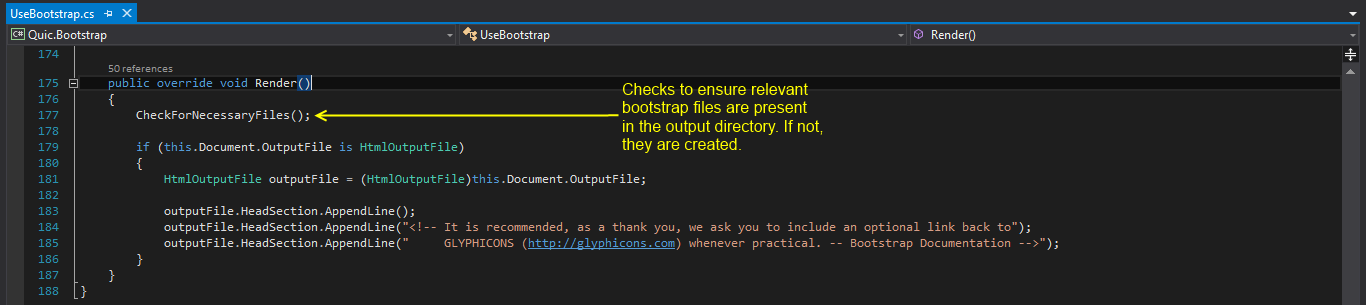
For instance, I wrote a class calledUseBootstrap[Quic.Bootstrap\Elements\Resources\UseBootstrap.cs]. It is a resource element (inherits fromQuic.ResourceElement[Quic\Core\Elements\ResourceElement.cs]), so you include it within the<head>tag of your HTML file.<head> <UseBootstrap /> </head>
What this element does is to create all the necessary Bootstrap files, as can be seen in theRendermethod of theUseBootstrapclass.
In the methodCheckForNecessaryFiles(), relevant missing files are created.
This demonstrates that (unlike some similar technologies) Quic elements (custom tags) have the ability to write to the output directory.
Note that Quic tags do NOT have access to any directory outside the output directory, and the output directory is always chosen by the user. - Works well with other web frameworks.
Quic works well with other web frameworks/technologies because Quic is simply a preprocessor. It goes through your file looking for custom tags that make sense to it. Every other content on the file is left untouched.

As at the time this idea struck me I was not aware of existing similar solutions. However, as I progressed deeper into the project, I ran into technologies and frameworks like Facebook's React and helpers in ASP.NET that serve similar purposes.
Background
I'm not primarily a web developer, so I tend to favour short-cuts when working on web applications. Any time I come across a cool web user interface component I always find myself wishing there was a function I could just call and have it emit all the HTML mark-ups (usually<div> tags), CSS classes and JavaScript codes needed to produce such a component. I am also put off by how untidy these mark-ups and scripts always look. What more, I would love to easily reuse these components, in much the same way we reuse components in, say, C#.That is how the idea behind Quic came about, some years ago. Since its inception the idea has undergone many changes. Initially, Quic wasn't built with HTML in mind; it was built to work with any user interface mark-up language. It is only in recent month that I decided to position Quic as a web technology. Some of the reasons for that include the fact that most people will use it with HTML (as against XAML, or Android XML); and focusing it on the web makes it easier to explain. Also, by focusing on the web I got to remove those areas of the source code that existed to make Quic generic. Thus, I have a slimmer code base.
QUIC means Quic User Interface C... I can't remember what C originally meant. It may have been Creator or Converter
The snail logo was chosen rather playfully to be an antonym to the idea of the project, snails being slow. But, perhaps, it also represents laziness, Quic being targeted at lazy web developers, like myself, who like to get more done by doing little.
To successfully follow the source codes in this framework, all you need is a healthy knowledge of C#. Two of the core namespaces used are
System.Xml.Linq (I previously used System.Xml, but found it difficult retrieving line number and column number information) and System.Reflection to help me load the relevant assemblies and classes.Getting Started
System Requirements
- The app was built on a Windows 8 machine, but should run with no modification on Windows 7 and Windows 10.
- The target framework is .NET Framework 4.5, but the source code can be built against many previous versions, as well as .NET Framework 4.6.
The Quic Bar
I am assuming you have downloaded (and extracted files from) the relevant zip files.- Run the solution; the start-up project should be Quic.App, so this should run the Quic.App.exe executable.

- The Quic bar is an always-visible floating toolbar. It's size allows you to continue writing your markup in your preferred editor, returning easily to the bar whenever you are ready to build the file. When maximized, the bar is fixed at the top of your screen, but when in normal window mode (restored), it can be dragged to any location on the screen.
In building a file, custom recognizable tags in the file are interpreted/processed, similar to how a PHP interpreter/engine works on a PHP file. Unlike a PHP engine which may send the result of the processing to a browser, the Quic bar saves its own result as an output file in the specified output directory, along with every other asset that was generated during the build. - Using the Quic bar is easy. Having typed your markup in an editor of your choice, select the file (file extension is irrelevant), select your output directory, then click the Build source file button.

- The Show/hide notifications button will have a green badge on it if the build was successful. Click the button to view any available notifications.

- Click the Open output directory button to navigate to the output directory.
Notice the auto-generated files and folders in the output directory.


Using Quic Custom Tags on Your Web Pages
Although Quic was originally built to work with any kind of file, it now focuses more on HTML file. Quic expects XML-compliant files. So, you are really working with XHTML files. Quic cares little about the extension of your file.Basic Structure
Because of the focus on HTML documents, Quic expects the root tag of the document to be<html>. Quic expects your <html> tag to have <head> and <body> tags. These tags are always in lower case.The
<html> tag is expected to have certain attributes that determine how the document is processed. We will take a close look at the <html> tag in this article.The
<head> tag is expected to contain resource elements. These elements usually hold resources that can be used over and over in the document.The
<body> tag contains UI elements. Theses elements define the user interface of the document.A sample Quic document is shown below.

<head> and <body> tags will be looked into in the next article.The <html> Tag
The<html> tag contains three classes of attributes relevant to Quic:Namespace attributes
Namespace attributes define the namespaces utilized in the document. To explain namespaces we will work with the ed.xml document shown above.We know that when Quic finds a tag in your document, it tries to find and instantiate an object of a class whose name matches the tag name. How does Quic know where to search when trying to match a tag to a class? It does this by examining the XML namespace (xmlns) attributes attached to the root
<html> tag. These attributes hold the locations of assemblies and namespaces from which Quic elements can be instantiated.If the value of a namespace attribute contains a colon (:), the part to the left of the colon identifies the file path (could be relative or absolute) of the assembly (typically a .DLL file) to search, and the part to the right of the colon identifies the namespace to search. If the value of a namespace attribute contains no colon (:), then that value refers simply to the file path of the assembly to search. This is typically used when you want to find classes that have no enclosing namespace (like most classes in my Quic.Bootstrap.dll assembly).
Your Quic document contains tags without prefixes and tags with prefixes. When a tag without prefix is encountered, there are two possibilities:
- The value of the default namespace attribute,
xmlns, holds the assembly and the namespace of the class to instantiate, and the name of the class is the same as the name of the tag.
In our sample document, on line 13 you find the tag<UseBootstrap />with no prefix. If you go up to line 3 you find the default namespace attributexmlns="Quic.Bootstrap.dll". This means that the tag<UseBootstrap />points to a class namedUseBootstrap(with no containing namespace in this case) found in the assembly Quic.Bootstrap.dll which, in this case, must be located in the same directory as our sample document, as shown below:
The same rule applies to other tags in the document like<Form>,<Grid>,<Row>,<Column>. - There is a namespace attribute that matches this tag, and the value of that attribute holds the assembly and the fully qualified name (not just namespace, but namespace and class name) of the class to instantiate.
In our sample document above, on lines 22 and 23 you find the tags<radix>and<rad>with no prefix. If you go up to lines 6 and 7 you find the matching namespace attributesxmlns:radixandxmlns:rad. On further inspection you notice that both attributes have the same valueQ uic.Ed.dll:Quic.Ed.Math.Radix. This means that the tags<radix>and<rad>both point to the same classQuic.Ed.Math.Radixfound in the assembly Quic.Ed.dll which, in this case, must be located in the same directory as our sample document, as shown in the directory image above.

When a tag with prefix is encountered, Quic finds a namespace attribute that matches the prefix of the tag, and the value of that attribute holds the assembly and thenamespace of the class to instantiate, and the name of the class is the same as the name of the tag.
In our sample document, on line 21 you find the tag
<math:Radix> with prefix math. If you go up to line 5 you find the matching namespace attribute xmlns:math="Quic.Ed.dll:Quic.Ed.Math". This means that the tag <math:Radix> points to a class named Radix in the namespace Quic.Ed.Math. Therefore, the full name of this class is Quic.Ed.Math.Radix, and it is found in the assembly Quic.Ed.dll located in the same directory as our sample document.It, therefore, follows that the tags
<math:Radix>, <radix> and <rad> all point to the same class. This becomes evident when you view the output file generated by Quic from this document.
Processing option attributes
There are certain Quic-specific attributes that are expected in the<head> tag that determine how the page will be processed. Looking at the ed.xml document shown above, we see one of such attributes on line 9, IgnoreAttrbuteCase. The list of processing option attrbutes (and their descriptions) is given below:- AllowUnknownAttributes: This is true by default. If true, this tells Quic not to throw an exception anytime it encounters an attribute it does not understand. Such an attribute (and its value) will be left untouched by Quic.
I should mention here that, just as tags map to classes in the appropriate assemblies, attributes map to public, read-write properties of those classes. - AllowUnknownTags: This is true by default. If true, this tells Quic not to throw an exception anytime it encounters a tag it does not understand. Such a tag will be left untouched by Quic.
There is a good reason whyAllowUnknownAttributesandAllowUnknownTagsattributes are true by default. This is to allow Quic parse regular (X)HTML documents that will surely contain tags and attributes that have no matchning classes and properties in any of the assemblies included in the document (via the namespace attributes). You can explicitly set them to false if you want your document to consist strictly of Quic-recognisable tags and attributes. - IgnoreAttrbuteCase: This is false by default. If true, this tells Quic not to be case-sensitive when trying to match a tag attribute to a class property.
- IgnoreTagCase: This is false by default. If true, this tells Quic not to be case-sensitive when trying to match a tag to a class.
There is a good reason whyIgnoreAttrbuteCaseandIgnoreTagCaseattributes are false by default. This is to make Quic case-sensitive. The rationale here is that your typical HTML tags and attributes should be written in lowercase while your Quic tags and attributes should be written in pascal notation, which is the same notation you would use for your class and public property names in C#. So, this would mean that<button>should be a HTML tag while<Button>should be a Quic tag.
Note that irrespective of the values of theIgnoreAttrbuteCaseandIgnoreTagCaseattributes, the<html>,<head>and<body>tags are always in lowercase, and the Quic-specific attributes found in the<html>tag are always written in pascal notation.
Output file attributes
Another Quic-specific attribute that is expected in the<html> tag is the OutputFile attribute, as seen on line 10 in the ed.xml document shown above. As you may have already guessed, this attribute describes the final output file that will be generated by Quic after all the relevant processing/preprocessing has been done.If the value of the attribute starts with a single opening brace and ends with a single closing brace (as seen in ed.xml), then the first part (
core:HtmlFile in this case) points to a class that will initialize the output file, and the second part (ed.html in this case) is the name with which the output file will be saved in the output directory. Values of attributes defined this way are typically subject to the same rules of namespacing discussed in Namespace attributes above. In this case, a class namedHtmlFile will be loaded from the assembly Quic.Core.dll (as defined on line 4, xmlns:core="Quic.Core.dll"). This class is expected to derive from the class Quic.FileInitializer [Quic\FileInitializers\FileInitializer.cs], found in Quic.dll.If you check the source codes for the project Quic.Core you will not find any class called HtmlFile. So what does Quic do? Anytime Quic doesn't find a file initializer it appends the strings
"Initializer" or "Initialiser", and performs the search again. So, in this case, Quic will then search for HtmlFileInitializer[Quic.Core\FileInitializers\HtmlFileInitializer.cs], and will find it.From the source code you can see that the class
HtmlFileInitializer in project Quic.Core extends the class Quic.HtmlFileInit [Quic\FileInitializers\HtmlFileInit.cs] in project Quic. Quic.HtmlFileInit in turn extends Quic.FileInitializer.The implemented method
InitializeFile of Quic.HtmlFileInit initializes an output file as it deems fit:public override OutputFile InitializeFile(QuicDocument doc, string filename)
{
HtmlOutputFile htmlOutputFile = new HtmlOutputFile(filename);
htmlOutputFile.CurrentSection = htmlOutputFile.HeadSection;
//put it in the output dir
if (doc.OutputDirectory != null)
doc.OutputDirectory.Add(htmlOutputFile, true);
return htmlOutputFile;
}
Your output file class (Quic.HtmlOutputFile [found in Quic\Core\Output\OutputFile.cs] in the code above) must derive from the class Quic.TextFile [found in Quic\Core\Output\OutputFile.cs] found in Quic.dll.See the output file generated in the output directory:

If the value of the
OutputFile attribute does NOT start with a single opening brace or does NOT end with a single closing brace, your output file will be a plain text file and the entire value of the OutputFile attribute is taken as the name of the file.Points of interest
In this article I have introduced the Quic framework and discussed the tool available to utilize it. I have also started discussing the basic structure of a document that is supposed to be preprocessed by Quic. Although some source code snippets were displayed here, they will be discussed in more details in coming articles; the main purpose of this article is to get you aware of and interested in Quic, interested enough to go further and use it make the UI part of your web development a little easier.In the next article(s) we will be talking about:
- the
<head>tag - the
<body>tag - value providers
- understanding the Quic source code
- creating your own Quic elements